Pantry Party June Round Up

pantry

If studying for the bar has taken anything from me, the list would include: energy, motivation, self-esteem, and time. There’s probably more. But this lack of time makes it hard to post on here (…or cook), but I do actually have a recipe I’ll be putting up hopefully later today. But my lack of time also made it harder for me this month to get the news on Pantry Party’s theme out. We don’t have a ton of entries, but we do have some great looking recipes anyway.

This month, Pantry Party went cheesy. Bloggers around the blogosphere were challenged to make a dish using items from their pantry that included cheese. Vegans were not excluded though, despite the clearly dairy theme. Vegan cheese was encouraged and accepted as well!

The next theme will be up in a few days, on July 1st. Hope you join us!

Galette

The first dish comes from Camilla at Culinary Adventures with Camilla. This Caramelized Red Onion-Potato-Mozzarella Galette looks like a great use of cheese! I’ve never actually had a galette, but I think I’m going to have to try my hand at one now.

Rhubarb1

Camilla shared another dish as well, much different than the above galette. This Rhubarb Salad with Salt-Crusted Beets, Feta, and Spring Greens, uses cheese in a healthier way: a salad! With all this cheese, it’s good we have some greens in here!

IMG_9079

I made two dishes this month, the first being Sriacha Mac and Cheese. I love making mac and cheese from scratch with different flavor combinations. This spicy cheesy dish was perfect. And it was easier than most other mac and cheeses I’ve made from scratch.

IMG_9096

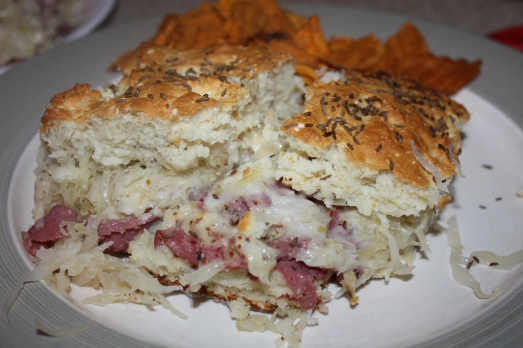
I’m also sharing my Baked Reuben Sandwich, which might look strange, but I ate way more of it than necessary. The slices of swiss in it were all melty and wonderful.

dsc_6162

Janet from The Taste Space made me so happy that I included vegan cheese in my description for the theme, because if I hadn’t this wonderful veggie dish wouldn’t be with us right now. This dish, Zucchini “Meatballs” and Tomato-Curry Sauce with Almond Parmesan, is such a fun play on the traditional spaghetti and meatball dish. The cheese that Janet uses is Raw Vegan Parmesan which is made from almonds, yeast flakes, miso, and salt. I’m so fascinated by this! And with the Indian flavors in this fun meatball dish . . . I’m loving it!

red velvet bars 3

Isn’t it cool that cheese doesn’t have to be savory? Michelle from Ms. enPlace took us away from the world of savory cheeses and made Red Velvet Cheesecake Bars. Michelle has a history with red velvet, with her grandpa making it for her for her birthday one year. These bars were introduced to Michelle by a co-worker. Michelle’s love of red velvet made her love this variation! I’m loving it too and I haven’t even tried one.

DSCN3091

These next three cheesy dishes come from Lori at Lori’s Culinary Creations. Her first shared dish is her Cheesy Millet Cakes. Lori first learned about millet in a grains class she took. I’m first learning about it from Lori! These look lovely and cheesy, using delicious Monterey jack cheese.

DSCN3035


Lori also showed up cheese for breakfast, with this Fondue-Style Cheese & Mushroom Omelet. This looks rather messy to eat, but all that melty cheese in the omelet is looking mighty tempting!

DSCN2308


Lori shared the last dish of the month: Moist Cheddar Chicken. In line with one of our previous themes (breaded,) I absolutely love chicken coated with cheese. This looks great and is a nice close to our month!

Cheese was more fun that I even expected this month. We had savory, sweet, breakfast, and vegan!

Now, what will next month bring?

Mocha-Honey Blueberry Loaf

IMG_9119


I essentially ate dessert for breakfast the last few days. My only response to your judging is, “why shouldn’t I?” And seriously, why shouldn’t you? What’s stopping you from having your dessert first thing in the morning?

This loaf is such a combination of yummy flavors. I wasn’t sure how it would come together, but I liked it a lot. I hope I like the blueberry bacon breakfast cake as much that I’m making tomorrow.

I told you there were a lot of blueberries at the market.

Mocha-Honey Blueberry Loaf

Ingredients
2 cups all-purpose flour
1 tbsp baking powder
1 packet of Starbucks Via instant coffee
3/4 tsp kosher salt
1/2 cup butter, softened
1/2 cup honey
1/2 cup sugar
2 eggs
1/2 cup milk
1/2 cup blueberries
1/2 cup chocolate chips

Directions

1. Preheat oven to 350. Grease a loaf pan and set aside.

2. In a mixing bowl, mix together the flour, baking powder, coffee, and salt.

3. In the bowl of a stand mixer, cream the butter until it’s soft. Add the honey and sugar to the butter, a little at a time, making sure to cream together. Add the eggs one at a time. Add half of the dry mixture, keeping the beater beating the batter. Add 1/4 cup of the milk. Add the remaining dry ingredients, followed by the other 1/4 cup of the milk. Make sure everything is combined and that there are no dry spots.

4. Using a wooden spoon, fold the blueberries and chocolate chips into the batter.

5. Pour into your loaf pan. Bake for 45 minutes, or until a toothpick stuck in the middle comes out clean. Let cool for 10 minutes before removing from the loaf pan.

* makes 1 loaf
* shared with Full Plate Thursday & Showcase Your Talent Thursday

Greek Yogurt, Blueberry, and Chocolate Parfaits

IMG_9105This month upon surfing the waves of food blogs, I found a new monthly round-up that I decided to participate in. This new round-up is called Feel Good Food and it’s hosted by A Kick At The Pantry Door. Each month there will be a theme, where bloggers are challenged to make a healthy recipe holding to the theme that doesn’t lose the delicious tastes we all crave and love. This month’s theme was blueberries, which is more than perfect given the vast abundance of them right now at the farmer’s market.

I have blueberries coming out of my ears. Between the parfaits, pancakes, and a mocha-honey blueberry loaf, I still have a ton.

It’s great I’m entering this round-up so I can get some other ideas on how to use these blueberries from the other great recipes!

IMG_9103

Greek Yogurt, Blueberry, and Chocolate Parfaits

Ingredients
1/4 cup fresh blueberries
1 cup plain Greek yogurt
2 tbsp chocolate chips
1/4 cup granola

Directions

1. Spoon 1 tbsp of blueberries on the bottom of two glasses. Spoon 1/4 cup of yogurt over the top of the blueberries. Top with 1 tbsp chocolate chips and then 1 tbsp granola. Repeat the layers.

* serves 2
* 184 calories per serving
* Besides Feel Good Food, this recipe is shared with Wednesday Whatsits & Cast Party Wednesday


Baked Reuben Sandwich

IMG_9096


This month’s Alphbakes letter is the letter R! Alphabakes is a monthly round up hosted by Caroline Makes . . . and The more than occasional cook. Each month a letter is picked and what are bloggers supposed to do ? Bake the letter of course!

When I first saw R I thought I should do raspberry something (which I still might do actually.) But I’m not one who likes predictability. Instead I decided to go as far from raspberries as I could get: a reuben sandwich.

When I was little my mom made reubens all the time. Of course, she did it the right way. She used corned beef. She used rye bread. But… I can’t find sliced corned beef at my grocery store nor did I really feel like making corned beef. So I opted for another cured meat: pastrami. It’s not quite the same, but it’s salt like corned beef.

Now obviously, this isn’t the standard reuben at all. A reuben is a sandwich on rye with corned beef, sauerkraut, swiss cheese, and thousand island dressing. So, my reuben maybe shouldn’t even be called a reuben, but it had the same taste I vividly remember from the sandwiches my mom used to make.

AlphaBakes Logo

Baked Reuben Sandwich
(source)

Ingredients
2 cups bisquick
1 cup milk
1 egg
2 tsp caraway seeds
1/2 lb sliced pastrami
1/4 cup deli style mustard
6 slices swiss cheese
1 14-oz can sauerkraut
1/2 cup thousand island dressing

Directions

1. In a large bowl mix together the bisquick, milk, eggs, and 1 tsp of the caraway seeds. Spread the 1/2 of the bisquick mixture onto the bottom of a 5-inch baking dish.

2. Spread the mustard all over the pastrami. Layer the pastrami on top of the bisquick. Cover with cheese. Spread the sauerkraut on top. Sread the remaining bisquick over the sauerkraut and sprinkle the top with the remaining 1 tsp of caraway seeds.

3. Bake for 30 minutes. Serve with the thousand island dressing on the side.

* serves 6
* besides Alphabakes, this recipe is shared with Pantry Party’s Cheese Theme, & Mix It Up Monday

Tempura Sushi Salad

IMG_9092


This month the movie at Food ‘n Flix was very different than the one I hosted last month. Instead of a French dystopian movie, this month’s movie is a documentary about a Japanese sushi chef. Camilla is our host this month, having picked this documentary with its beautiful shots of sushi.

If anyone knows sushi, it’s Jiro. But frankly, this movie didn’t inspire me to make sushi – it terrified me. I’ve never done it before, so I knew any attempt from me would be laughable. I can just see it. It’s embarrassing even in my head. Maybe one day I’ll try sushi, but then not document my failure, because who wants everyone to see that? Being that Jiro is a huge perfectionist, I think he would have appreciated my refrain from trying to participate in his art.

In the film, Yamamoto tells us that there are five attributes of a great chef:

1. Take your work seriously
2. Aspire to improve
3. Maintain cleanliness
4. Be a better leader than a collaborator
5. Be passionate about your work

I am not a cook. I am an amateur that cooks for myself and my boyfriend. I enjoy food, but I am no cook. But I find these attributes so important to employ in all fields of work, to be a good lawyer I’ll need many of those traits as well. The only that might not quite apply is 4, because I think leaders also need to collaborate, but those five attributes can be applied to more than just cooks.

Be passionate.

Anyway, because I did not feel inspired to make sushi, I took it and ran with it a bit. I decided I’d use all the things I love in sushi and make a salad. Though I actually really love raw tuna in my sushi (along with other raw fish,) I’m not sure of where I could get fish fresh enough to eat raw and I didn’t want to chance severe sickness. I instead made tempura with shrimp and green beans. Considering my favorite sushi roll is the spider roll (with fried soft shell crab, yumm!) making tempura for my sushi salad seemed appropriate.

FoodnFlix

Join us at Food ‘n Flix, get inspired, be passionate.

Tempura Sushi Salad

Ingredients
1/2 cup white wine
1/2 tsp salt, divided
8 shrimp, peeled and deveined
a handful of green beans with the ends snapped off
1/4 cup flour
1/3 cup ice water
1/4 cup cornstarch
1 egg yolk
1/4 tsp sugar
1/2 cup shortening, divided
1/2 tsp baking powder
1 cup cooked rice
2 carrots, diced
1/2 cucumber, diced
1 sheet nori, cut into strips
1 avocado, diced

Directions

1. Marinate the shrimp in the white wine and 1/4 tsp of salt for 20 minutes.

2. Mix together flour, ice water, cornstarch, egg yolk, sugar, 1 tsp of the shortening, baking powder, and 1/4 tsp of salt. Once well mixed, coat the shrimp and the green beans with the batter.

3. Heat the shortening in a cast iron skillet or a wok. Once hot add the shrimp and the green beans, in batches, a few at a time. Cook the shrimp about 3 minutes per side, until golden brown. Flip and cook for about 3 more minutes on the other side. Continue until all the shrimp and green beans are fried. Let drain on a paper towel.

4. Put your salad together in a bowl. Add 1/2 cup of rice in each bowl. Surround with the cucumber and carrot pieces. Top with half of the tempura per bowl. Top with avocado and nori.

(serve with soy sauce if you want some!)

* serves 2
* besides Food ‘n Flix, this dish is shared with #FoodieFriday & Foodie Friday

Mint Chocolate Chip Pancakes

IMG_9082

For the last few We Should Cocoa‘s I’ve made muffins. This month’s theme, mint, however got me into another breakfast kick. And you know, I might stick with pancakes at We Should Cocoa until I get some other ingredient that just kicks me into another direction with my chocolate. But we’ll see what next month brings before I make any pancake promises. I mean, you never quite know where the chocolate will lead you until you get there, you know?

We Should Cocoa is a monthly chocolate themed round-up hosted by Choclette and Chele. This month Victoria is hosting the mint theme!

Ever since I was a little girl, I’ve loved pancakes. But I really loved pancakes that had chocolate chips in them. My mom also used to make me M&M pancakes when we were out of chocolate chips. Besides the fact that I have a crazy obsession with chocolate, I love chocolate chips in my pancake because they’re rather self-syruping. I’m not a huge maple syrup fan, but dry pancakes are bleh. If you add chocolate chips to the pancakes and they’re kind of melty, you really don’t need anything else. The pancake does it all on its own.

While my mom never made me mint chocolate chip pancakes when I was little, I would have went crazy for these. The mint was so nice with the chocolate (well, duh) and the pancake. It very easily could be a dessert. But dessert for breakfast works for me!

We_Should_Cocoa_V3

Mint Chocolate Chip Pancakes
(source)

Ingredients
1 1/3 cup all-purpose flour
1 tbsp sugar
1 tsp baking powder
1/2 tsp baking soda
1/2 tsp salt
1 cup buttermilk
1 egg
2 tbsp butter, melted
1/2 tsp vanilla extract
1/2 tsp mint extract
3/4 cup semisweet chocolate chips

Directions

1. Mix together the flour, sugar, baking powder, baking soda, and salt in a large bowl.

2. In a smaller bowl whisk together the buttermilk, egg, butter, vanilla, and mint. Once well mixed, pour into the dry mix. Stir together until all dry spots are gone. Stir in the chocolate chips.

3. In a cast iron skillet sprayed with cooking spray, heat over medium-high heat. Scoop 1/4 cup of batter per pancake. Cook for 1-2 minutes, until the bottom is golden brown and the edges begin to bubble. Flip and cook on the other side for about 1-2 minutes.

* makes 8 pancakes
* besides We Should Cocoa, this post is shared with Wednesday Whatsits and Cast Party Wednesday

Sriacha Mac and Cheese

IMG_9079


If you may or may not know, this month’s Pantry Party theme is cheese. The goal for this month is to open that pantry of yours, see what needs to be used in there, and make something cheesy! And I realize cheese doesn’t fit a vegan diet, so I’m also including dishes using vegan cheese.

When I started thinking cheese this month my brain automatically went to mac and cheese. Rather than trying to be horribly creative, I went the mac and cheese route. I decided to use something more than just pasta from my pantry and found a bottle of sriacha. After googling around I found the perfect recipe: Sriacha Mac and Cheese.

This is probably the easiest mac and cheese I’ve ever made. It doesn’t use a roux, like many do. Rather, you kind of just mix everything in there and let it bake. The flavor of the sriacha and the cheese was a great combination. Loved it.

This pantry party really used my pantry. I used:

Noodles
Sriacha
Breadcrumbs
Red chili flakes

I may make another recipe this month for the party . . . We’ll see! I do love my cheese.

smaller

Sriacha Mac and Cheese

Ingredients
1/2 lb dry pasta
2 cup breadcrumbs
3 1/2 cups cheddar cheese, shredded and divided
2 tbsp sriacha, divided
4 tbsp butter, divided
1/2 tsp red chili flakes
1 egg, beaten
1/2 cup heavy cream

Directions

1. Boil a large pot of water. Cook the pasta to package directions until al dente. Set aside and let drain.

2. Preheat oven to 350. Melt 3 tbsp of the butter.

3. In a bowl, combine the breadcrumbs, 1/2 the cheese, 1/2 the sriacha, and the melted butter. Add half of this mixture to the bottom of a baking dish.

4. With your cooked pasta, stir in the remaining cheese, sriacha, butter, and red chili flakes. The cheese will strt to melt around the pasta, stir until everything is well coated. Next pour in the beaten egg and the cream. Stir to combine. Pour into the baking dish over the breadcrumbs. Top the pasta with the remaining breadcrumbs. Spray the top with a cooking spray.

5. Bake for 25 minutes. Remove from the oven and let cool for 5 minutes before serving.

* serves 4
* Besides Pantry Party, this dish is shared with See Ya In The Gumbo

Banana Blueberry Muffins

IMG_9068


I’m getting into this big breakfast thing. I have a routine on bar prep class days. I wake up at 5:30. I exercise. I shower. I make a  nice breakfast. I go to class and have a snack. I have a healthy lunch. And then I study study study until it’s time for a yummy dinner.

I’ve been having all types of breakfasts: waffles, omelets, pancakes, breakfast sandwiches, and now muffins.

My friend Andy was staying with me for a night and she told me that she had told one of her other friends that I was a “boss.” She went on to say, who studies for the bar and has time to make muffins in the morning before class? Well, one answer. I do. I do best with my schedules that keep me going going going. With all this study study study I have to go go go pretty much constantly.

Banana Blueberry Muffins
(source)

Ingredients
2 1/2 cups flour
1 tsp baking soda
pinch of salt
1 1/4 cups blueberries
1/4 cup honey
1/2 cup brown sugar
2 ripe bananas, mashed
1/4 cup plain yogurt
1 egg
3/4 cup skim milk

Directions

1. Preheat oven to 325 and grease 2 muffin trays. On the 2nd tray you only need to prepare 3 of the cups.

2. Place the flour, baking soda, salt, and blueberries together in a bowl. Mix together. In another bowl combine the honey, sugar, banana, yogurt, egg, and milk. Whisk together. Pour the wet ingredients into the dry and mix together, making sure to get rid of any dry spots.

3. Spoon the batter between the 15 cups, diving equally. Bake for 20 minutes or until a toothpick stuck in the middle comes out clean.

* serves 15
* Shared with Weekend Potluck, #FoodieFriday, & Foodie Friday


Bacon Crusted Chicken

IMG_9065

The idea of meat crusted is not something I ever could have fathomed. It’s also probably something that has vegetarians shivering at the sight of this dish – my apologies! But I saw this recipe posted on PaleoDish and I just had to make it. My confession of the evening is that I don’t even know what the Paleo diet is, I just know I’m probably not paleo, but if bacon covering chicken is some type of delicacy for those that eat paleo, well.. I need to start following some paleo blogs for food ideas or something.

OK – I just skimmed about paleo. I don’t get it. But whatever. Bacon is good in my book.

Word to the wise: I am not paleo, like I just said above. Please be advised, I’m sure my use of all-purpose flour does not fit the diet guidelines and is my own . . . addition. For the real recipe that uses almond flour, go here. I can’t justify buying almond flour. I don’t particularly like it.

In other news, I was just thinking, maybe I shouldn’t have named my blog the Law Student’s Cookbook. Now I’m like, the Law Graduate. Then what? Do I stay at the Law Student’s Cookbook forever? Right now I should be the Bar Slave’s Cookbook or something, because besides cooking, eating, and blogging, the rest of my life has been dedicated to trying to learn things

I may have known at one point, but definitely don’t anymore.

Bacon Crusted Chicken

Ingredients
1 lb bacon
2 boneless skinless chicken breasts, cut in half and pounded out
several tbsp of flour
2 eggs, whisked
1 tsp dried basil
1 tsp garlic powder
1 tbsp olive oil

Directions

1. Line a baking dish with aluminium foil. Cover with bacon. Place in a cold oven and turn the heat on to 400. Cook bacon for approximately 20 minutes, or until desired doneness.

2. Drain the bacon and let cool. Once cool place in a food processor and process until well chopped.

3. In a shallow bowl, combine the bacon, flour, and spices. In another shallow bowl, combine the eggs.

4. Dip each piece of chicken in the eggs. Then cover with the bacon.

5. In a cast iron skillet over medium-high heat, heat the olive oil. Once hot add the chicken and cook for 3 minutes per side.

* serves 2
* shared with Full Plate Thursday & Showcase Your Talent Thursday


Better For Your Breakfast Sandwich

IMG_9062

This month at Random Recipe’s, Dom challenged us to randomly choose a healthy recipe from our recipe collection. I only have one book dedicated to healthy food and I don’t currently have time to go through every book and every recipe to see if it qualifies for what I consider to be healthy. With ease in mind, I pulled the book off the shelf: Cook Yourself Thin a book based on a Lifetime TV show. Or was it the other way around?

Cook Yourself Thin is my favorite cookbook of all time. Dom challenged us to make recipes that are both healthy and happy – healthy recipes that make us smile. The best thing about Cook Yourself Thin is that everything I’ve made in the book so far has made me smile quite big. I opened the cookbook randomly to page 78, The Better For You Breakfast Sandwich. The book explains that this sandwich is meant to replace the traditional bacon, egg, and cheese sandwiches with something healthier. This sandwich is approximately 300 calories – 300 calories of yum.

So.. I kind of predicted the one problem I’d have with the dish, but I decided to follow it to the tee anyway. The idea of a poached egg on a sandwich seemed sort of messy, but if the cookbook called for it.. Let’s do it! I made the sandwich and had some trouble getting the top piece of bread to stay on, but all was okay until I bit into the sandwich, only to look down to see egg yolk all over my shirt. The sandwich was delicious – I really liked the tomatoes. But oh man… That egg yolk was everywhere.

randomrecipes2

The Better For You Breakfast Sandwich

Ingredients
1 tbsp vinegar
2 English muffins
2 slices of colby jack cheese
2 thin slices of ham
2 eggs
2 slices tomato
1/2 tbsp dried oregano
salt and pepper, to taste

Directions

1. Preheat the oven to 350. Fill a large, deep skillet of water to a depth of 4 inches. Add vinegar and bring to a steady simmer.

2. Arrange the muffin halves on a baking sheet and using a round biscuit cutter, cut each side of the bread into a round. Cut the cheese slices using the round biscuit cutter. Place a slice of cheese on the bottom half of each English muffin. Cut the slice of ham into shreds and place on top of the cheese. Transfer to the oven and bake until cheese melts and top halves are toasted, about 4 minutes.

3. As the muffins are cooking, spritz the tomato with some cooking spray. In a nonstick pan over medium-high heat, saute the tomato slices for 1 minute on each side. Then season with salt, pepper, and dried oregano. Set aside.

4. Break one egg into a small bowl. Hold the edge of the bowl close to the simmering water and gently tilt the bowl to our out the egg into the water. Repeat with the remaining egg. Cook until the whites are solid and the yolk is runny, about 3 minutes. Carefully remove the eggs one at a time with a slotted spoon. Transfer to a  plate with paper towels to let drain.

5. Remove the muffin halves from the oven and transfer to a plate. Place a slice of tomato on top of the ham and top with a poached egg. Season with salt and pepper and top with the other half of each muffin. Serve immediately.

* serves 2
* Besides Random Recipes, I’ve shared this recipe with Wednesday Whatsits & Cast Party Wednesdays