Gingerbread Bundt Cake

IMG_0020

Bundt cakes are such funny cakes. As I was making the bundt cake, I began to question who was the wise man that made such a fun shaped cake tin. Well, I still don’t know who that person was. What I do know, is that the bundt cake is based on a traditional European cake but was popularized in the US in the ’50s and ’60s.

This cake was made for both Alphabakes and Tea Time Treats, with Alphabakes’s giving me the letter G this month (so ginger!) and Tea Time Treats’s having a free for all.

This bundt actually seemed more breakfasty to me than anything, so it has provided me a week’s worth of breakfast. It’s pretty dense, but the flavor is great and gingery with a bit of citrus!

Gingerbread Bundt Cake
(original source)

Ingredients
3 cups all-purpose flour
1 tsp baking soda
1 tsp baking powder
1/2 tsp salt
2 tbsp ground ginger
2 tsp ground cinnamon
1 tsp ground nutmeg
1/2 cup vegetable oil
3/4 cup brown sugar
1/3 cup maple syrup
4 large eggs
1/2 cup plain yogurt
1 cup milk
1 tsp vanilla extract
ORANGE GLAZE:
1 cup powdered sugar
1 tsp orange zest
3 tbsp milk

Directions

  1. Preheat oven to 350 and grease a bundt tin.
  2. In a medium sized bowl, sift together the flour, baking soda, baking powder, salt, ginger, cinnamon, and nutmeg.
  3. In another bowl, beat together the vegetable oil, sugar, syrup, eggs, yogurt, milk, and vanilla.
  4. Fold the dry ingredients into the wet ingredients. Pour into the bundt tin.
  5. Bake for 60 minutes.
  6. Remove the bundt from the oven and let cool. Then remove from the tin and cool longer.]\
  7. In another bowl, mix together the ingredients for the glaze. I prefer the glaze to be thinner. If you want it thicker, add less milk.
  8. Pour the glaze over the cake.

AlphaBakes Logo TeaTimeTreats DDT-button-new2015-175

Ham and Arugula Shortcrust Rolls

IMG_0019.JPG

I’m always coming across new food challenges to participate in. It helps me be keep my recipes varied, because I get new ideas of things to make! In my internet sleuthing, I found The Pastry Challenge. The idea of the Pastry Challenge is to make a pastry item that meets the monthly theme. This month’s theme was anything, which really is a nice way to start this since I haven’t been doing much baking lately.

I decided to use the first time back into pastry baking to be a dinner item – this is a shortcrust wrapped up with ham, arugula, mustard, and parmesan cheese. It was a great choice. I added just a bit too much water to the dough, but all-in-all, delicious!

Ham and Arugula Shortcrust Rolls

Ingredients
1 cup flour
1/8 tsp red chili powder
1/8 tsp kosher salt
1/ 8 tsp ground black pepper
4 tbsp unsalted butter, chilled and cut into cubes
1 tbsp + 1 1/2 tsp parmesan cheese
1 egg yolk
3 tbsp ice water
2 tbsp honey mustard
5 slices honey ham
1/3 cup arugula

Directions

  1. Sift the flour, chili powder, salt, and pepper together. Put into a food processor and pulse several times.
  2. Add the butter and pulse into a course meal is formed.
  3. Add the 1 1/2 tsp cheese and pulse several times.
  4. Add the egg and pulse several times.
  5. Add the water 1 tbsp at a time and pulse until the dough comes together.
  6. Shape into a ball and wrap in seran wrap. Refrigerate for half hour.
  7. Roll out the dough on a floured surface. Smear with mustard. Top with ham, arugula, and 1 tbsp parmesan.
  8. Roll into a wrap, starting on the long side.
  9. Put in the refrigerator for 45 minutes.
  10. Preheat oven to 375. Cut the dough into slices. Place on a baking sheet. Bake for 15 minutes.

* makes about 9 rolls

pastry_challengesmall-victories-sunday-linkup-button-red

Caramelized Onions and Red Wine Naan Pizzas

FullSizeRender 2

I don’t know what’s wrong with me blogging lately – I just have zero motivation to do it. I’ve also lost a lot of motivation for cooking. I’m hoping to change it up in the New Year, mostly because I like to look back and create this sort of cookbook of recipes I liked enough to eat again. So I think a new year’s resolution is going to be to update this thing like once a week. That shouldn’t be impossible.

This year has just been zipping by. I don’t know where this year went. And also, this holiday season has just snuck up on me. I’m going to my parents’ on Wednesday until Sunday. Then back home to ring in 2016.

This month’s Alphabakes is all about the letter “N.” Caroline and Ros are letting the letter “N” stand for NOEL, so I’m expecting they’ll be receiving a ton of sweet treats baked up specially for the holidays! I veered in a different direction this month.

AlphaBakes Logo

Caramelized Onion and Red Wine Naan Pizzas
(original)

Ingredients
2 pieces of pre-made garlic naan
1 1/2 tbsp olive oil, divided
1 onion, sliced
4 oz mushrooms, sliced
1/4 cup red wine (I used the rest of the Bogel zinfandel I had drank over the weekend)
2 tbsp parsley, minced
1/2 tbsp rosemary, minced
1 cup mozzarella, shredded
1/4 cup feta
salt and pepper, to taste

Directions

  1. Preheat the oven to 425.
  2. In a pan, heat 1 tbsp olive oil. Add the onions and cook them over medium-high heat, allowing them to brown. Make sure they do not burn by stirring occasionally. Season with salt and pepper and set aside.
  3. In the pan, heat the remaining 1/2 tbsp of olive oil. Cook the mushrooms for 4 minutes, until the mushrooms are tender.
  4. Pour in the wine, parsley, and rosemary with the mushrooms. Cook until the mushrooms have soaked up the wine. Season with salt and pepper.
  5. Place your naan on a baking sheet.
  6. Sprinkle the naan with the mozzarella. Top with the onions. Then top with the mushrooms. Finish by sprinkling feta on top.
  7. Bake for 10-12 minutes.

* serves 2
* This is also being shared with Mix It Up Monday

Brown Butter Pumpkin Chocolate Caramel Chip Marshmallow Cookies

IMG_9863

It is true – this cookie has absolutely every flavor in it. (Okay, that’s a gross exaggeration . . . but this cookie really does have a lot of different flavors in it.) The pumpkin and marshmallow keep these cookies very moist. And I really love moist chewy cookies. They are always my favorite. My boyfriend prefers a crisper cookie, so these are all mine! Yes!

My grocery store had these chocolate chips that were filled with caramel. They worked perfectly in this cookie!

Brown Butter Pumpkin Chocolate Caramel Chip Cookie
(original recipe)

Ingredients
1/2 cup unsalted butter
1 1/2 cups all-purpose flour
1 cup graham cracker crumbs
1 1/2 tsp pumpkin pie spice
3/4 tsp baking soda
1/4 tsp salt
1/2 cup brown sugar
1/2 cup granulated sugar
1 egg white
1 tsp vanilla extract
1/4 cup pumpkin puree
1 cup chocolate caramel chips
marshmallow creme

Directions

  1. In a small saucepan, melt your butter on medium-low heat.
  2. Once the butter melts, stir gently. Once you see brown bits at the bottom of the pan, take it off the heat: you have browned butter! Put it in a small dish and place in the refrigerator to chill until you’re ready for it.
  3. In a medium bowl, mix together the flour, graham cracker crumbs, pumpkin pie spice, baking soda, and salt.
  4. In the bowl of a stand mixer with the paddle attachment, beat together the browned butter you made earlier with your sugars. Beat until fluffy.
  5. Beat in the egg white, vanilla, and pumpkin puree until well combined.
  6. Turn your mixer to low. Pour the dry ingredients into your wet ingredients. Mix until just combined.
  7. Using a spatula, fold in your chocolate caramel chips. Cover with plastic and place in the refrigerator for at least two hours.
  8. Preheat your oven to 350. Prepare two cookie sheets with parchment paper and set them aside.
  9. Roll the chilled dough into 1 1/2 tbsp balls. Flatten between your hands. Place a dab of marshmallow creme in the center of the flattened ball. Fold the dough gently around the marshmallow, rolling it into a ball so it covers the marshmallow.
  10. Place on your baking sheet, 2 inches apart.
  11. Bake for 9 minutes, until the edges of your cookies are light golden brown. Let sit on the baking sheets for 5 minutes before placing on a cooling rack to cool.

* makes approximately 18 cookies
* I’m sharing this recipe with Beth Fish Reads’s Weekend Cooking

Magic In The Middles

IMG_9852

It is my favorite time of year! Christmastime! And on top of that, it’s my favorite blog event of the year! It’s the 4th Annual Christmas Cookie Swap, hosted by Bread Booze Bacon, White Lights on Wednesday, Home Made Interest, It Is A Keeper, Our Mini Family, Cooking On The Front Burners, and Create Craft Love. For the fourth year, bloggers are paired up to share cookie recipes during what I like to call, cookie season. Last year the cookies I was given to make were oatmeal cookies – this year took a different approach!

This year I was paired with Janae from Jay Tried and True. Janae shared her recipe for Magic In The Middles, a fun twist on the chocolate and peanut butter cookie. You get a chocolate cookie stuffed with peanut butter!

I love chocolate and I love peanut butter, so this was a great cookie to start my holiday baking. What a delicious cookie! And they seemed to turn out perfect.

This baking and photo taking did make me realize though that my camera needs to be cleaned, because every picture had the same dark blob in the middle of it. This picture happened to sort of hide it, because it’s right where the table is.

I plan to post more cookie recipes this season. There’s always room for cookies!

2015 Christmas Cookie Recipe Swap SQUARE

Magic In The Middles

Ingredients

DOUGH
1 1/2 cups all-purpose flour
1/2 cup cocoa powder
1/2 tsp baking soda
1/4 tsp salt
1/2 cup sugar
1/2 cup packed brown sugar
1/2 cup unsalted butter, softened
1/4 cup smooth peanut butter
1 tsp vanilla extract
1 large egg

FILLING
3/4 cup smooth peanut butter
3/4 cup powdered sugar

Extra sugar for topping

Directions

  1. Preheat oven to 375.
  2. Line 2 baking sheets with parchment paper (or the very handy Silpat which is my favorite thing ever.)
  3. In a medium bowl, whisk together the flour, cocoa powder, baking soda, and salt.
  4. In another bowl, beat together the sugars, butter, and peanut butter until light and fluffy.
  5. Stir the dry ingredients into the wet ingredients, making sure all the ingredients are well combined.
  6. Make the filling next, by stirring together the peanut butter with the powdered sugar.
  7. With floured hands, roll the filling into one inch balls.
  8. Break off 1 tbsp of the dough. Make an indention in the center and press a peanut butter ball into the dough.
  9. Bring the dough around the peanut butter filling and roll into a ball, so the dough surrounds the peanut butter.
  10. Dip the top of each cookie into your extra sugar. Place on the baking sheet about 2 inches apart.
  11. Grease the bottom of a drinking glass and use the glass to press the cookies to about 1/2-inch thick.
  12. Bake for 7-9 minutes.

See the rest of the delicious cookies here!

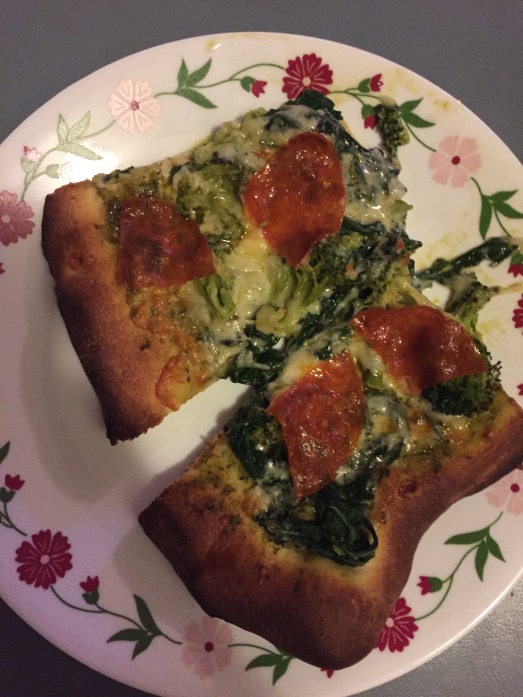
Broccoli Arugula Pepperoni Pizza

IMG_2408

Eek! The day is speeding by and I needed to get this dish made and posted! Food ‘n Flix is celebrating its 5th birthday this month and to celebrate, we could make a recipe based on ANY of the past movies hosted by the fun monthly challenge. I’ve participated in and hosted a ton of the Food ‘n Flix months in the past.

The past movies I hosted included Eat Pray Love, Delicatessen, Elf, Like Water For Chocolate, and Lady and the Tramp. And! In October I’m hosting Hocus Pocus!

Anyway, Food ‘n Flix has been such a fun monthly thing to participate in. It’s truly one of my favorite food round-ups. Heather, our fearless leader, is hosting our big party this month.

I decided to watch a movie I’d seen before, but one that I didn’t cook from for Food ‘n Flix because it was before i found out about this community. I watched Mystic Pizza!

vxn5a9x72ylwvwn2

Mystic Pizza (starring Julia Roberts who is always my favorite,) is about three girls who work at the Mystic Pizzeria. A true coming of age story, this movie follows sisters Kat and Daisy and their friend JoJo. When not following their own young loves, these girls work at a pizza parlor known for its secret (and delicious) sauce.

This was the perfect movie for me to watch, because I LOVE PIZZA. I love pizza so much. And I always have. When I was a little girl (probably around 3 or so,) my parents had ordered a pizza and brought it home for dinner. I sat down at the table and burst out crying. “What’s wrong Betta?” my parents asked.

“You can’t eat pizza! Pizza’s my friend!”

I didn’t cry over the chicken we ate or the cow or the pig – you know, living things. No, I cried because they were eating my dear friend Pizza. My friendliness with pizza has clearly changed, because now I’d eat it any day of the week.

I didn’t have time to make the dough for this pizza and tried the Pillsbury Pizza Crusts that were in a tube. It was surprising good and super easy! I need to get some more of those for some easy dinner nights.

FoodnFlix

Broccoli Arugula Pepperoni Pizza

Ingredients
pizza dough for one pizza
2 cups chopped broccoli
5 cups baby arugula
1/2 cup pesto
spicy pepperoni
1/2 cup white cheddar cheese, shredded
salt and pepper, to taste

Directions

  1. Preheat oven to 450. Stretch your pizza dough on a baking sheet. Bake for 10 minutes.
  2. While the dough is baking, bring a pot of water to a boil. Add the broccoli and cook for 3 minutes. Add the arugula to the water and let wilt. Drain. Add salt and pepper to taste. Set aside.
  3. Spread the pesto on the pizza crust.
  4. Spread the broccoli and arugula over the pesto.
  5. Sprinkle the cheese over the top. Place the pepperoni on top of the cheese, covering the pizza.
  6. Bake for 10 minutes.
  7. Allow to sit for 10 minutes before attempting to cut.

Jalapeno Bacon Cornbread

IMG_9806

Alphabakes letter of the month is J! I love the Alphabakes challenge hosted monthly by either Ros or Caroline. It always gets me brainstorming of ingredients or recipes I can make in a way that I usually don’t. J wasn’t the hardest letter to use. I got stuck on jalapenos – and with that, I made cornbread with jalapenos in it!

What a delicious bread. The combination of the sweet cornbread, the bacon, and the peppers was perfect. I served it alongside some fried chicken (which I might be sharing in the next post.)

I am now incredibly full. And have a lot of cornbread leftover.

AlphaBakes Logo

Jalapeno Bacon Cornbread
(source)

Ingrdedients
8 slices bacon, cut into pieces
1 1/2 cups all-purpose flour
2/3 cup white sugar
1/2 cup corn meal
1 tbsp baking powder
1/2 tsp salt
11/4 cups skim milk
2 large eggs
1/3 cup + 3 tbsp vegetable oil
1 jalapeno, deveined and seeded, minced

Directions

  1. Preheat oven to 350. Spray a pie tin with cooking spray.
  2. Heat a skillet over medium-high heat. Cook the pieces of bacon. Once they are crispy place them aside on a plate covered in paper towels.
  3. In a medium bowl combine all the ingredients. Stir together until all the dry ingredients are mixed into the wet ingredients.
  4. Pour into your baking dish. Bake for 35 minutes or until cooked all the way through.

Chocolate Spiced Rum Cupcakes Stuffed With Strawberries

IMG_9782

One of my all-time favorite challenges to participate in each  month is We Should Cocoa. This month we were left to our own devices – essentially go out and make something chocolate! But without the usual conditions (either to cook a certain type of chocolate food, to cook with a certain ingredient, etc.) This month I was allowed to do whatever I wanted! So I decided to make cupcakes.

Now, to be honest about this situation though, these cupcakes came about because I have a bottle of Kraken Spiced Rum. I bought this bottle of rum because I like the bottle and because I want to make a lamp out of it. But obviously I need to drink the rum out of it first, yes? To help me with that I made these delicious cupcakes. They are denser than I really would have preferred, because I somehow was out of baking soda and substituted with a combination of cream of tartar and baking powder. While I still got some rise from the cakes, the texture was definitely altered from this substitution. But still! I love them. I stuffed them with strawberries that had been cooked down in the rum. And while Matt initially whined that there wasn’t any frosting, these cupcakes do not need frosting.

We_Should_Cocoa_V3

I haven’t been doing a whole lot of baking lately. But perhaps if I do more of these food challenges, I can get back in the groove? These cupcakes are also going to be submitted to Tea Time Treats – this month’s theme being Summer Baking.

TeaTimeTreats

Chocolate Spiced Rum Cupcakes Stuffed With Strawberries

Ingredients
1 1/4 cup sugar, divided
1/2 cup unsalted butter, softened
2 eggs
1/2 tsp vanilla extract
1 cup spiced rum, divided
1 3/4 cups all-purpose flour
3/4 cup cocoa powder
1/4 tsp cream of tartar
1/4 tsp baking powder
1/2 tsp kosher salt
8 oz strawberries, chopped into 1 inch pieces

Directions

  1. Preheat oven to 350. In a mixer bowl, beat together 1 cup of sugar and the butter. Add the eggs, one at a time. Beating in until fully combined. Beat in the vanilla extract and 3/4 cup of the spiced rum. Beat together for 2 minutes.
  2. In another bowl, mix together the flour, cocoa powder, cream of tartar, baking powder, and salt. Mix together until combined.
  3. Pour the dry ingredients into the wet ingredients and beat until well combined.
  4. Prepare a cupcake tin with cupcake liners. Divide the batter between the 12 cupcake liners.
  5. Bake the cupcakes for 20 minutes, or until cooked. Let cool.
  6. While the cupcakes are cooling, make the center filling. In a small saucepan combine the strawberries, 1/4 cup of the spiced rum, and 1/4 cup of sugar. Bring to a boil, stirring occasionally. Cook for approximately 5 minutes, until half reduced and slightly thickened.
  7. Using an apple corer (or something similar,) remove a portion of the center of each cooled cupcake. Fill with the strawberry filling.

* makes 12 cupcakes
* This recipe was also shared with Flour Me With Love.

Szilvas Pite (Plum Cake)

IMG_9759

Well… Looks like something got into this cake before I could take a picture of it. I can’t blame anyone, because imagine this. Plum cake topped with vanilla ice cream? It’s too hard to resist. I wish I had more left actually, because my mouth is watering just thinking about it.

The downsides of this? I clearly didn’t sprinkle the sugar/cinnamon mixture on top of it very evenly. I actually had forgot. And then tried to do it while the cake was in the oven. That wasn’t my best baking moment.

This cake, or szilvas pite, is a Hungarian desert. I got the recipe from Saveur, which also included an article from 2013 by Carolyn Banfalvi, about Hungarian cuisine.

“I was getting full, but, wait, there was dessert: szilvás pite, a sheet cake dotted with fresh plums that we chased with strong black coffee . . . I make szilvás pite, reveling in the way the tart, juicy ripe plums from the market meld with the tender sheet cake.”

My plums sunk, perhaps I should have used a bigger baking dish to make it less thick? But I really liked the density of the cake. Despite the sunk plums, the taste was so perfect. Not too sweet, but the taste of the plums made it divine. And my plums were fresh from the farmers’ market. Even better.

F1 Foods 1

I made this recipe for Caroline from Caroline Makes . . . fun food challenge called Formula 1 Foods, following the Formula 1 Grand Prix foodie style.

Szilvas Pite

Ingredients
1/2 cup all-purpose flour
1/2 tsp baking powder
1/4 tsp kosher salt
1/2 cup sugar, plus 1 tbsp sugar separated
1 egg
1/2 cup Greek yogurt
2 tbsp vegetable oil
1/2 tsp almond extract
4 ripe plums, halved and pitted
1/8 tsp ground cinnamon

Directions

  1. Heat oven to 375. Grease a round cake tin and set aside.
  2. Whisk flour, baking powder, and salt in a bowl.
  3. In another bowl whisk together 1 cup of sugar and the egg. Then mix in the yogurt, vegetable oil, and almond extract.
  4. Slowly combine the dry mixture to the wet mixture. Mix with a wooden spoon, making sure that the batter is thoroughly mixed.
  5. Pour the batter into your tin. Arrange the plums, cut side down, over the cake batter.
  6. Combine the sugar and cinnamon in a small bowl. Sprinkle over the cake batter.
  7. Bake for 50 minutes. Remove from the oven and let cool before serving.

Blueberry and Chocolate Banana Bread

IMG_9696

Um…. Hello? Hello out there? Can anyone hear me? I have fallen off the world of blogging for nearly two months. I’m not sure what happened except life just kept going. I’ve been working nonstop, because I still have 11 days left until I’m off of my probationary period at work and can actually take time off. I’m taking time off this month to travel to Ohio to see family.

In the last two months I’ve been in trial about every other week, got new privileges at work (which don’t really equate to a promotion, because that’s not how it works – but I can now handle more serious cases,) and I moved into a new house. I’m still renting and I’ve downsized significantly. I was paying nearly $1200 a month for the house I was in, which realistically isn’t that much money for the size of house we were in, but I was just spending more than necessary. I mean, we didn’t really need a house that big for the two of us and our cat. So we are saving $300 a month now, but my kitchen is significantly tinier. I’m trying to come up with ways to maximize the storage, because there isn’t much shelving. We already bought something to use as a pantry for the food, but oh my god, I have so much kitchen stuff. There were more boxes of kitchen stuff that we moved than anything. Is that embarrassing?

We officially moved on the 20th, but then we had to clean out the old place and I got busy at work . . . and we hadn’t gone grocery shopping. We finally went today, so I decided to take this as a new start.

I will post in my blog again.

I will also try to lose weight again.

Today’s food won’t help with the weight loss . . . but at least I’m posting in my blog?

One of my favorite challenges continued in my absence (because apparently the world continues even when I don’t!,) and this month I decided I would play again. Given chocolate is my downfall in life, I decided it would be the most likely challenge for me to actually do. So I used the oven in my house for the first time today and found a recipe that combined blueberries and chocolate for We Should Cocoa. This banana bread is so moist and filled with such yummies. My boyfriend took a bite and exclaimed, “This is the best banana bread I’ve ever had!” So there it is. I’m back and I have banana bread.

I had to make a few variations from the original recipe, because I thought I had sugar? But I don’t? Or it’s still packed? I don’t know. I made it work with powdered sugar and it came out just fine.

We_Should_Cocoa_V3

Banana and Chocolate Banana Bread
(original source)

Ingredients
1/2 stick of butter, softened
3/4 cup powdered sugar
2 large eggs
4 bananas, mashed
3 oz semi-sweet chocolate chips
1 3/4 cup flour
1 1/2 tsp baking powder
1/2 tsp baking soda
1/4 tsp salt
1 cup blueberries

Directions

1. Preheat the oven to 350 and grease a loaf tin.

2. Cream the butter and sugar together until fluffy. Add the eggs one at a time, fully mixing them into the butter.

3. Add the banana and chocolate and mix with the butter.

4. Sift the dry ingredients together and mix them with the wet mixture until just combined. Stir in the blueberries, making sure not to break them.

5. Spread the batter into the loaf tin and bake for 60 minutes. Remove from the oven and let stand for 20 minutes before slicing.

* makes 1 loaf
* besides We Should Cocoa, this dish is also being shared with Small Victories Sunday