Top 12 For 2012

top12

THE TOP 12 DISHES OF 2012!

I decided that like a lot of blogs, I should showcase the most viewed recipes for the year. It’s been a great year of food and I’m looking forward to another.

Peanut Butter Chili
Funfetti Cake Batter Milkshake
Cheesy Chicken Parmesan
Lemon Rolls
Broccoli-Cheddar Soup
Beer Battered Grilled Cheese
Coupe Coupe and Yucca Fries
Butternut Squash Pizza
Fish Stew and Flat Bread
Jerk Chicken, Vegetable Patties, and Banana Fritters
Slow Cooker Chicken Pot Pie Stew
Slow Cooker Lentil Vegetable Stew

Pantry Party December Round Up

pantry

This month I introduced Pantry Party and I’m hoping it has success. All you need to do is cook something based on the theme of the challenge using some ingredients found in your pantry. To kick things off this month and get the concept introduced, the theme was anything goes. I wanted to see what cooking out of your pantry means to you with this theme. And boy! There was a vast array of dishes submitted this month. I hope the participation continues from all of you and that more people join in as well!

The next theme will be posted on the 1st of January, the 1st day of 2013! How exciting!

Now onto the recipes shared this month!

dsc_46551


Janet at The Taste Space shared a hearty looking bowl of Red Lentil Dal with Zucchini. This thick soup is perfect for the cold months and looks like it’s full of flavors. Janet obviously grabbed some lentils out of her pantry to make this dish!

Tumbleweed-Contessas-Peppermint-Chip-Cookies1

Linda at Recipes and Ramblings with Tumbleweed Contessa shared some beautiful Pink Peppermint Christmas Chip Cookies. Now, let me fill you in on these cookies. Linda sent me the recipe for these cookies for a virtual cookie swap we both participated in. My version of the cookies are here. These pink peppermint cookies are perfect for the holiday season! For this challenge Linda found her baking supplies in her pantry!

BILD0302

Christian at Cooking Around The World shared Moussaka with us. Christian has a very cool blog, where he has gone around the world in food. I attempted a similar project and didn’t make it very far. But Christian clearly persevered much longer than I did with such challenge. This moussaka dish, made with eggplant, feta, and other ingredients focuses mainly on fresh ingredients. But this dish also calls for Greek noodles and tinned tomatoes – things found in the pantry! Just because you rely on your pantry doesn’t mean your food can’t be fresh and delicious also!

IMG_8260


My contribution this month was a chicken recipe, Bridgeport Saltine Crusted Chicken. I had originally intended to make a Ritz crusted chicken, but because of my busy schedule I was unable to get to the store and buy the crackers, so I made the crust for the chicken with saltine crackers and Bridgeport seasoning – hiding in my pantry.

saus shells a


Michelle over at Ms. enPlace made Stuffed Shells. The combination of flavors in this sounds great: Italian sausage, poblano, leek, garlic, cheese . . . I need to make this too! Michelle wrote that she always has partial boxes of pasta shells in her pantry. I’m glad she had the opportunity to use that partial box on these!

chorizo pasta (500x387)

Cornia from Searching For Spice contributed with a recipe for Tomato and Chorizo Pasta. Corina always has pasta, onions, and tinned tomatoes  in the cupboard which provided a great base for this recipe. The addition of the chorizo to the sauce sounds so good to me right now.

6a00d835508b1869e2017c34de689d970b

Last, but definitely not least, Simona of Bricole shared Risotto al Gorgonzola. Simona gives a description on what risotto is (besides delicious) as well as some information about herself and her own introduction to this beautiful dish. My favorite part of her blog post though was the audio recordings of her saying the Italian words.

I love that so many distinct and beautiful dishes came with the contents of our cabinets.
Next month there will be a theme, so be on the lookout! Like I said, it will be announced on the 1st and I am very excited. Thanks everyone for participating and I hope to see you again next month!


Red Velvet Shortbread Cookies

IMG_8410


This is probably my last Christmas-themed post until 2013. I’ve already shared my Christmas breakfast, my Christmas dinner, Christmas cookies I made as presents, and now finally I’m sharing one of the many cookies I made after a cookie baking extravaganza that ensued once I was officially on my break.

Now.. I actually baked a lot more cookies than just these shortbread cookies.. But I forgot to take a picture of them before they were gone. The only reason there were extra of these was because I made a second batch because the first batch disappeared in lightening speed. Of the cookies I made this season, these were my absolute favorite (tied closely to the Mocha Swirl Cookies I gave as presents this year.)

The first batch of these cookies was beautiful, more beautiful than these. My red was deeper because I had a better food coloring than my mom had in her house, and I used these white sparkly sprinkles on the first batch. Had my mom had that more crystal like type of sprinkle I would have used that instead of the jimmy style sprinkles. I thought they looked prettier and were less bulky on the cookie. I liked that the cookie wasn’t overly sweet like many cookies that come at Christmas – but this is a shortbread and is more buttery than anything.

If I’m part of any cookie exchanges next year, this is the cookie I’ll be sharing for sure.

Red Velvet Shortbread Cookies
(source)

Ingredients
1 1/4 cups all-purpose flour
1/3 cup sugar
2 tbsp unsweetened cocoa powder
1/4 tsp salt
1/2 cup butter, cold and cut into chunks
1 tbsp red food coloring (or if you’re using a gel food coloring, DO NOT use that much – use enough to make a deep red)
3 oz chocolate chips
1 1/2 tsp shortening
sprinkles

Directions

1. Preheat your oven to 325. In a food processor, combine the flour, sugar, cocoa powder, and salt. Process several times to combine well. Add the food coloring and butter, several chunks at a time and pulse until the mixture resembles crumbs. Continue to process until the mixture begins to clump together.

2. Remove the dough from the processor bowl and place it on a floured surface. Knead lightly until smooth. Roll out the dough to about 1/2-inch thickness. Using a round cookie cutter that is approximately 1 1/2-inches round, cut out the dough. Place the cookies on an ungreased cookie sheet. Place the dough scraps together and roll out again, continuing to cut as many cookies out of the dough as possible.

3. Bake for 20 to 25 minutes. Transfer cookies to a wire rack and allow to cool.

4. In a heavy sauce pan, melt the chocolate chips and shortening over low heat, stirring consistently. Dip half of each cookie into the melted chocolate and then sprinkle the melted chocolate on the cookie with sprinkles. Let stand on waxed paper until dry.

* makes about 2 dozen cookies
* shared with Foodie Friday, Freedom Fridays, & Friday Food Frenzy

Christmas Dinner 2012

IMG_8396

Every year at Christmas we try to do something different. Last year for Christmas we had a German-inspired meal. We always have several dishes that require more effort than a normal night’s dinner. My mom and I spend most of the day and most of Christmas Eve preparing for the meal. It’s small, just the nuclear family (though we typically have an honorary guest, this year a dear friend of mine from childhood who happened to be in the area, my dad’s cousin, and his girlfriend.) But the reason we do it small, is because we typically like to do something more intensive than what you could easily serve a bigger group.

I posted the Christmas Dinner Menu earlier this month. The only changes to that menu were that instead of the breaded Brussels sprouts we had balsamic glazed Brussels, we switched crown roast recipes though the concept was essentially the same, and instead of the mixed berry sauce on top of the panna cotta, there was a cranberry sauce instead.

I’m not sharing all of the recipes, I’m only sharing the recipes that I personally cooked or was involved because they’re the ones I know the changes we might have made. All the dishes are shown though, because you need to see the meal!

IMG_8398

The star of our meal was the Crown Roast of Pork with Apple and Hazelnut Stuffing. Our crown wasn’t the prettiest crown there is, because there are definitely better butchered crowns, but given the store didn’t charge more for it than the cost of the pork chops individually, it’s hard to complain.

The brine called for a lot of salt, which we ended up halving because the recipe called for 9 cups of salt which is a lot. The problem was that even then, the salt didn’t all dissolve into the water, and frankly, all the seasonings in the brine really didn’t come through in the meat at all. All in all though, the stuffing was a show stopper and was delicious. The pork was really just pork chops, but they were perfectly cooked and yummy. I’m not going to share this recipe besides giving the link to the recipe we followed because my mom made some changes, but I am unsure what she did. I was in charge of the stuffing portion which we followed absolutely to the recipe.

IMG_8394

We also had a side of Burgundy Mushrooms from the Pioneer Woman. My mom had seen this recipe and was very excited to make it. The flavor of the mushrooms was divine. The only problem is that the bouillon contains so much salt and my family doesn’t really eat much salt, so we couldn’t eat very many mushrooms without needing to drown in a glass of water. But the flavors of the wine, butter, and mushrooms was great. I’m also not sharing this recipe because it wasn’t made by me.

IMG_8401

I promise, this isn’t just a picture post. I made sweet potato rolls. Mine didn’t come out quite as beautiful as those on Food Done Light, but the flavor was perfect. The oven I was using is a little cool I think, so I had to bake them longer than the recipe said. The flavor of the sweet potato is extremely mild in these rolls. In fact, if I hadn’t told you there was sweet potato in it, you probably wouldn’t know. The rolls were soft and even two days later haven’t gone stale (we finished them off tonight with a spaghetti squash casserole.)

Sweet Potato Rolls

Ingredients
1 medium sweet potato, peeled
1/2 cup lukewarm water
2 tsp instant yeast
2 tbsp non-fat plain Greek yogurt
1 1/4 tsp salt
2 large eggs, divided
1/4 cup non-fat dry milk
1 1/2 cups whole wheat flour
1 3/4 cups to 2 cups all-purpose flour

Directions

1. In a large pot boil water over high heat. Add the sweet potato for about 20 minutes, until soft. Once the sweet potato is soft, remove from the water and smash. Place in the freezer until needed.

2. In the bowl of a stand mixer, combine the water, yeast, yogurt, salt, 1 egg, dry milk, and whole wheat flour. Beat with the paddle attachment, mixing on low speed until the dough starts to hold together. Add 1 1/4 cup of the all-purpose flour and mix more. Slowly add more all-purpose flour 1 tablespoon at a time, until you have a soft dough that is not sticky.

3. Replace the paddle attachment for the bread hook and use the bread hook on the dough for 6 minutes.

4. Place the dough in a greased bowl and cover with a towel. Let the dough rise for about an hour.

5. Deflate the dough. Tear the dough into 16 equal pieces. Place in a baking dish that has been sprayed with Pam. Cover the rolls with a towel and let rise for 30 minutes.

6. Beat the other egg and spread the egg mixture lightly over the rolls.

7. Bake the rolls for 20-25 minutes at 375. Allow to cool.

* makes 16 rolls

IMG_8402

Like I said above, instead of breaded Brussels like we had originally discussed at the last minute we decided there was a lot of bread going on, so we decided to make a simple balsamic vinegar sauce, roast the Brussels sprouts, and throw in some dried cranberries. It was a yummy addition to our meal. I would give you a recipe, but there isn’t one.

IMG_8395

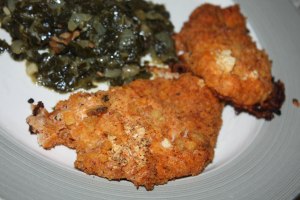
I’ve never made or heard of creamed onions before making this menu plan. I’m not really sure what inspired them or how I happened across the recipe. But I am convinced that this dish was the star of the meal. The onions get really sweet when you cook them as long as you need to in this dish, and how can you say no to sweet, creamy onions?

I’m not sharing this recipe since I hardly had a hand in it, but click that link above for a great recipe.

IMG_8403

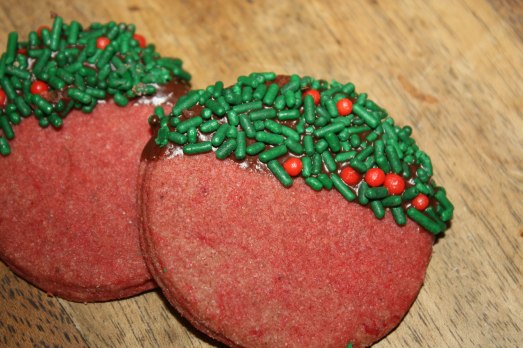
To end this meal we had panna cotta. For as simple as this recipe was I was incredibly intimidated by it and was convinced the whole thing was going to fall flat on its face. Luckily I was incredibly wrong. The panna cotta was delicious. But really, the process of making it was full of fail.

I made them Christmas Eve since they had to set in the fridge. I had sprinkled the gelatin in the bowl. As I went to go get water to add to the gelatin, I go back to find my bowl gone. My mom had loaded it into the dishwasher. Luckily I had more gelatin left. When boiling the cream, I turned my back for a second and the whole thing boiled over. Without me realizing it, it had also boiled over so much it had put the flame out. I didn’t realize for a few minutes and then had to resimmer the entire thing. I got everything into the molds and was sure it had failed.

Christmas Day I was surprised to see the panna cotta had set. When it became time to make the sauce I learned that all the blackberries we had bought to make the sauce with were disgustingly moldy. After scrambling around the kitchen I made the cranberry sauce with blood orange juice and honey. In retrospect I think I should have just served the panna cotta plain. The flavor of the cream was great on its own and didn’t need to be weighed down by any sauce. Also the cranberries were kind of tangy, so there’s that too.

Panna Cotta

Ingredients
2 tsp plain gelatin
1/4 cup cold water
3 cups cream
1/2 cup powdered sugar, sifted
1 piece of vanilla bean 1 1/2 inches long, split

Directions

1. In a small bowl combine the gelatin and water. Set aside.

2. Over medium heat, combine the cream, powdered sugar, and vanilla bean. Bring to a simmer and simmer for 5 minutes.

3. Remove from heat and add the gelatin to the mixture. Mix well until the gelatin has completely dissolved.

4. Pour into 6 1/2 cup molds or ramekins. Refrigerate for at least 8 hours.

5. To remove the panna cotta from the ramekins, run a sharp knife around the sides and then flip upside down. Top with a fruit sauce (or not.)

* makes 6

What did you have for Christmas dinner this year?

* shared with Full Plate Thursday, Catch A Glimpse Party, and Linkin’ up Thursday


Christmas Breakfast 2012

IMG_8388Over the next few days I will have several Christmas posts. There will be a Christmas breakfast post, a Christmas dinner post, and a Christmas cookie post. I figured it’d be best to stretch them out instead of cram everything into one overwhelming post of holiday cheer.

I go home to my parents’ house every year for Christmas. On Christmas Day we always wake up around 9 a.m. Of course, when my brother and I were little that used to be significantly earlier, but now that we’re in our 20’s we all appreciate the sleep. We wake up, make coffee or tea, and open presents. Our dog Mozart does most of the unwrapping for us. He loves Christmas and loves pulling the paper off of presents, but he knows only to do it when we let him.

Yesterday I got everything I could have wanted. The best of the presents I received was the milk frother so I can make some delicious coffee drinks and beautiful white gold hoop earrings from my dad. It was a great Christmas. I gave my mom the cookbook Barefoot Contessa Foolproof, I made my dad homemade beef jerky, I got my brother whiskey rocks and tumblers, I got my dog a blanket and made him chicken jerky, and I got my cat new water/food dishes and some toys.

After opening presents, laughing, and having generally a wonderful time we enjoy a huge breakfast. I always try to make something festive (last year I made eggnog and gingerbread pancakes.) This year I made Eggnog and Cranberry Cinnamon Rolls, a recipe I found at The Dutch Baker’s Daughter. They were absolutely delicious (in fact, I had a leftover cinnamon roll this morning for breakfast.) Clearly I didn’t make the frosting to top the rolls, but they really didn’t need it. With the rolls we had bacon, eggs, fruit, and sausage bread. My mom makes sausage bread every year a few days before Christmas, so regardless of what we eat on Christmas Day, sausage bread is always a part of it.

Today I’ll be sharing the cinnamon roll recipe with you.
Tomorrow you can see what we had for our wonderful Christmas dinner.
What did you have for Christmas breakfast?

Eggnog and Cranberry Cinnamon Rolls

Ingredients
1 cup eggnog
1/4 cup butter
1 package active yeast
1 egg, room temperature, slightly beaten
3 1/4 – 3 1/2 cups all-purpose flour
1/2 tsp salt
1 cup brown sugar, packed
1 tbsp cinnamon
1/2 cup butter, softened
3/4 cup chopped fresh cranberries

Directions

1. Heat the eggnog and the 1/4 cup butter. Heat until the butter has melted. Remove from heat and let cool to about 110 degrees (Fahrenheit) – bathwater warm temperature.

2. In a large mixing bowl combine the eggnog mixture, yeast, egg, 2 cups of flour, and salt, beat well with the paddle attachment to a stand mixer. Add the remaining flour 1/2 cup at a time, stirring well after each addition. Continue until the dough has just pulled together. Remove the paddle attachment and put the bread hook attachment on. Knead with the bread hook in the stand mixer for 5 minutes.

3. Place the dough in a greased bowl and cover with a damp towel. Place in a location free from drafts. All the dough to rise and double, about an hour.

4. While the dough is rising combine the brown sugar, cinnamon, and softened butter in a small bowl.

5. Once the dough has doubled, place it on a floured surface. Roll the dough out into a 12×9-inch rectangle. Spread the cinnamon mixture on the rolled out dough. Sprinkle with the cranberries. Roll up the dough from the long end and pinch the seam to seal. Cut into 12 equal sized pieces and place into a greased 9×13 pan. Cover and let rise until doubled.

6. At this point you can either bake them or refrigerate them. If you refrigerate your rolls for the morning, cover with plastic wrap and place in the refrigerator. Before you bake the rolls let them sit out for a half hour.

7. Bake rolls in an oven preheated at 375 for 25-30 minutes, or until browned.

* makes 12 rolls
* shared with See Ya In The Gumbo

Mushroom Orzo

IMG_8340

I’m home at my parents’ for the holidays. My recipe posts may be light the next week (though I guess it’s possible they might be increased because I am helping around here, obviously.) It’s so nice to be home. I have slept an incredible amount since I’ve been here. I guess I didn’t realize how tired I was until I had a chance to actually relax and sit down and not have anything to do. This sleep is doing me well I think.

Last night for dinner my mom pulled a leftover turkey breast from Thanksgiving out of the freezer to thaw. After foraging the refrigerator we decided to make mushroom orzo. It was kind of reminiscent of risotto, cheesy, creamy, and delicious!

Mushroom Orzo
(source)

Ingredients
1/2 cup Brummel&Brown (or other margarine or butter), divided
1 onion, diced
1 cup uncooked orzo
1/2 cup portabello mushrooms, cut into pieces
1 cup water
1/2 cup white wine
garlic powder, to taste
salt and pepper, to taste
1/2 cup Parmesan cheese, grated
1/4 cup parsley, diced

Directions

1. Melt 1/4 cup of the Brummel&Brown in a heavy skillet over medium heat. Stir in the onions and cook until brown. Mix in the orzo, mushrooms, and remaining butter. Cook and stir for 5 minutes, until the butter melts and the mushrooms are tender.

2. Pour the water and wine into the skillet and bring to a boil. Reduce heat to low. Season with salt, pepper, and garlic, and cook for 9 minutes. Stir in the Parmesan and parsley.

* serves 6
* Shared with See Ya In The Gumbo

ENTER THE CHRISTMAS GIVEAWAY

Spaghetti Squash Casserole

IMG_8339

I’ve never participated in the Alphabakes Challenge before, but there’s always a time to start new things! Alphabakes, hosted by Ros and Caroline, where each month bloggers are challenged to make a dish that features an ingredient made with the random recipe of the month. This month’s random letter is S. You can find more information about this month’s Alphabakes here.

The cold weather has made an increase in squash consumption in my house. Since squash starts with an S (and so does Spaghetti Squash!) this seemed to be the perfect dish to share with Alphabakes.

I wish I could claim this recipe. It is however not mine. Everyday Maven posted this recipe and I was intrigued, for good reason. I should have roasted the squash the day before and if you do make this recipe, you should also roast your squash earlier than I did. By roasting the squash, prepping the dish, and then baking the casserole all back to back made this a pretty time consuming meal. But it really was worth it.

Spaghetti Squash Casserole
(source)

Ingredients
1 large spaghetti squash (you can prep the spaghetti squash in advance, but the directions to roast it are below)
1 egg
15-oz ricotta cheese
1 tsp salt
1/2 tsp ground black pepper
3/4 tsp crushed red pepper flakes
2 tsp Italian seasoning
3 tbsp olive oil
4 garlic cloves, minced
1 onion, diced
1/2 lb ground beef
1 head kale, sliced into thin ribbons
15-oz crushed tomatoes (about 2 cups)
1/2 cup Parmesan cheese, grated
1/2 cup bread crumbs

Directions

1. First prepare the squash. Preheat your oven to 350. Slice the top end of the squash. Cut the squash longwise so that you have two halves. Remove the seeds from the inside of the squash, scraping clean.

2. Place the squash halves cut side down on the baking sheet. Bake for 45 minutes.

3. Once the squash is cooked, remove and let cool. Once the squash is cool enough to touch (but not cold) take a fork and scrape the inside of the squash, to remove the strands of the spaghetti squash. Place them into a bowl.

4. Now you can prepare the rest of the casserole. Combine the egg, ricotta, 1 tsp salt, ground black pepper, crushed red pepper flakes, and Italian seasoning in a small bowl.

5. In another small bowl combine the Parmesan cheese, bread crumbs, and 2 tbsp olive oil. Set aside.

6. Turn the heat on the oven up to 425. Spray a 9×13 casserole dish with cooking spray and set aside. Place a large skillet (or a big pot) over medium-high heat. Once hot add 1 tbsp olive oil. Then add the garlic and onion and cook, stirring frequently, until tender.

7. Add the ground beef and break up with a wooden spoon. Cook until almost all the pink is gone.

8. Add the kale and crushed tomatoes. Stir to combine. Place the lid on the skillet and cook for 3 to 4 minutes, until the kale is wilted.

9. Remove the lid and add the spaghetti squash. Mix until well combined. Remove the dish from the heat and stir in the ricotta cheese mixture.

10. Pour the mixture into the prepared casserole dish and use a spoon to even out the top. Bake for 40 minutes.

11. Remove from heat and top with the breading. Spray with cooking spray and bake for 10 more minutes.

12. Let the dish sit for 10 minutes before cutting into it.

* serves 8
* besides Alphabakes, I have shared this recipe with Weekend Cooking

By the way, entries for Pantry Party should be entered during this next week!

AlphaBakes Logo

Strawberry Swirl Cookies

IMG_8333

This is the last of my swirl cookies. This season’s holiday sweets have been completed! I put three of each of the three cookies into Chinese carry-out style boxes in a mustard color. My Christmas theme (as you can see by my Christmas tree this year) is owls. I have owl wrapping paper, so on the cookie boxes I’m going to paste a cut out of one of the owls on the paper.

I’ve personally eaten far too many of these cookies, but that’s sort of the downfall in Christmas treat making.

I was inspired by the link shared below for these cookies, but I actually followed the recipe for the mocha swirls since I knew it produced beautiful cookies.

Last year I made different fudges for Christmas. 
Do you make sweets for presents at the holidays?
What are you giving this year, if you do?

Strawberry Swirl Cookies
(inspiration)

Ingredients
3 cups all-purpose flour
1 1/2 tsp baking powder
1/4 tsp salt
1 cup butter
1 cup sugar
1 egg
1/2 tsp vanilla extract
1/2 tsp strawberry extract
1/2 tsp red food coloring
colored sprinkles

Directions

1. In a medium bowl whisk together the flour, baking powder, and salt. Set aside.

2. In the bowl of a mixer, beat the butter and sugar until creamy. Add the egg and beat until combined. Slowly add the dry ingredients in and beat until you have a nonsticky dough.

3. Remove the dough from the mixer bowl and separate into two portions. Return one of the portions to the mixer and beat the vanilla in with the dough. Remove from the bowl.

4. Put the other half of dough into the mixer bowl and beat with the food coloring and strawberry extract.

5. Roll out each portion of dough between two sheets of wax paper, so that the dough is approximately 1/4-inch thick. Chill on a baking sheet in the refrigerator for an hour.

6. Remove the dough from the refrigerator and press the strawberry dough on top of the vanilla dough. Roll the dough into a log, starting on the long side of the dough. If the dough starts to rip as you’re rolling, press it back together. Go slowly.

7. Pour your sprinkles into a long, shallow pan. Roll your dough roll into the sprinkles, making sure the sprinkles stick to the dough.

8. Cover the dough roll in wax paper and then plastic wrap. Refrigerate for an hour.

9. Preheat oven to 350. Remove the chilled dough roll from the refrigerator and slice into 1/4-inch rounds. I got about 3 dozen cookies from one cookie dough roll.

10. Place the cookies on a baking sheet lined with parchment paper. Bake for 11 minutes.

* makes about 36 cookies
* shared with Tuesdays at the Table, Delicious Dishes, Tempt My Tummy Tuesdays, Tasteful Tuesday Party, Recipe Box, &   Tasty Tuesdays

Mocha Swirl Cookies

IMG_8327


Like I mentioned in my last post, I am making swirl (or pinwheel) cookies for Christmas presents this year. My plan was to make four varieties. It has changed to three due to technical difficulties with my peppermint/chocolate cookies. They tasted great, but they came out ugly. The mocha swirls on the other hand, are by far the most beautiful things I have ever made. Not only do they look great, but the taste was also amazing.

These swirl cookies definitely take some patience, but they are wonderful!

Mocha Swirl Cookies
(source)

Ingredients
3 cups all-purpose flour
1 1/2 tsp baking powder
1/4 tsp salt
1 cup butter
1 cup sugar
1 egg
1 tsp vanilla extract
1 1/2 tsp instant coffee (mine was hazelnut flavored)
2 oz semi sweet chocolate, melted and cooled

Directions

1. In a medium bowl whisk together the flour, baking powder, and salt. Set aside.

2. In the bowl of a mixer, beat the butter and sugar until creamy. Add the vanilla and egg and beat until combined. Slowly add the dry ingredients in and beat until you have a nonsticky dough.

3. Remove the dough from the mixer bowl and separate into two portions. Return one of the portions to the mixer and beat the coffee in with the dough. Remove from the bowl.

4. Put the other half of dough into the mixer bowl and beat with the cooled, melted chocolate.

5. Roll out each portion of dough between two sheets of wax paper, so that the dough is approximately 1/4-inch thick. Chill on a baking sheet in the refrigerator for an hour.

6. Remove the dough from the refrigerator and press the coffee dough on top of the chocolate dough. Roll the dough into a log, starting on the long side of the dough. If the dough starts to rip as you’re rolling, press it back together. Go slowly.

7. Cover the dough roll in wax paper and then plastic wrap. Refrigerate for an hour.

8. Preheat oven to 350. Remove the chilled dough roll from the refrigerator and slice into 1/4-inch rounds. I got about 3 dozen cookies from one cookie dough roll.

9. Place the cookies on a baking sheet lined with parchment paper. Bake for 11 minutes.

* makes about 36 cookies
* shared with Mix It Up Monday

Chai Spiced Spiral Cookies

IMG_8316


Christmas cookie baking has begun! For presents this year I’m giving people four varieties of spiral cookies.
Cookie Number One: Chai Spiced Spirals!

I’m not going to lie, I had already taken a bite out of the cookie in the photo. But.. It was so tempting. The cookie tasted wonderful. For being the fist of my spiral cookies for Christmas, it was a perfect success.

Chai Spiced Spiral Cookies
(source)

Ingredients
1 3/4 cup all-purpose flour, plus 3 tbsp flour for later
1 1/2 tsp baking powder
1 tsp ground cinnamon
1 tsp pumpkin pie spice
1/2 tsp ground ginger
1/2 tsp ground nutmeg
1/2 tsp ground cardamom
1/2 tsp salt
1/2 cup butter, at room temperature
2/3 cup sugar
1 egg, at room temperature
1 tsp vanilla extract
1 1/2 tbsp molasses
sugar for decorating

Directions

1. In a mixing bowl, mix together the 1 3/4 cup flour, baking powder, cinnamon, pumpkin pie spice, ginger, nutmeg, cardamom, and salt. Set aside.

2. In the bowl of a stand mixer, add the butter and sugar. Beat together until creamy. Add the egg and vanilla and beat until combined. Slowly beat in the dried mix until you have a nonsticky dough. Remove the dough from the mixing bowl and separate into two halves.

3. Return one half of the dough to the mixing bowl. Add the molasses and the 3 tbsp flour and beat until combined.

4. Cover and refrigerate both halves of the dough for a half hour.

5. Once chilled, roll each half of dough out separately to be about 1/4-inch thick with a floured rolling pin. Place the half of dough without molasses on top of the the other half of dough. Press together with a rolling pin.

6. Starting on the long side of the dough, roll the dough into a tight log. Roll the log into the sugar so that it coats the outside of the log. Wrap in wax paper and place in the refrigerator for an hour.

7. Remove from the refrigerator and cut the dough into even sized cookies. Your log should get you about 30 cookies. Place each cookie slice on a baking sheet lined with parchment paper. Bake in a preheated oven at 350 for 8 minutes.

8. Let cool on the sheet. Once cool to touch remove from the baking sheet and place on wire racks until completely cool.

* makes about 30 cookies